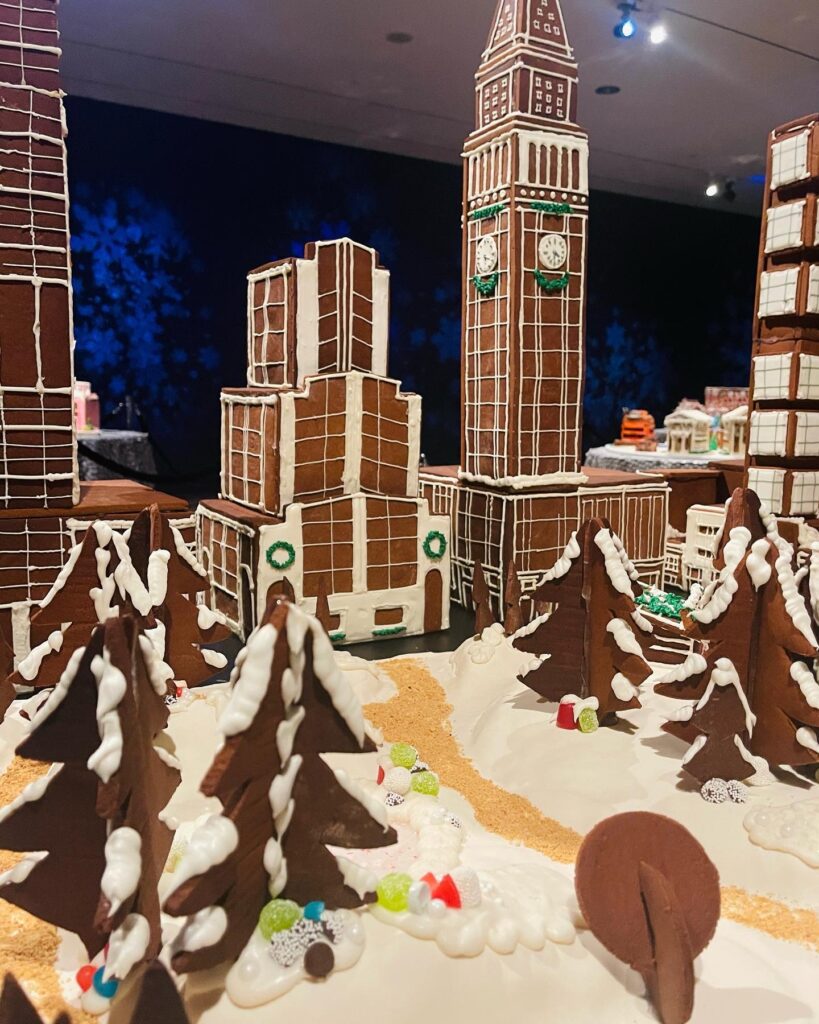
The improbable story of an architect baker being invited to bake a NYC gingerbread scene for the The Museum of the City of New York.

Below is the “structural” gingerbread recipe I used to accomplish the task. Note – if you’ve never baked gingerbread for building a structure (like me)… this gingerbread is specifically designed to be structural rather than tasty! Which means, the cookie will be relatively dimensionally stable (won’t spread tons in the oven), be relatively rigid and durable. I was able to sand, grind and cut cookie edges without breaking the entire cookie (surprisingly!). For sanding and grinding edges, I recommend using a microplane grater and for cutting I recommend using a serrated knife – like a bread knife.
A note about gingerbread building: In general, good luck and try your best! (haha…that’s all I have to say)
no…… kidding aside – here’s where the process felt a bit architectural – or more appropriately, school level architectural. Just know that, to piece together a building, you’re going to want straight edges and right angles (mostly). You’ll soon learn how frustrating and down right difficult it is to seam together two building sides that aren’t straight and even. SOOO… be cognizant of straight edges and ninety degree angles at all steps along the way. Creating strong cookie templates is important, using tools such as X-acto knives to precisely cut dough is critical, carefully transferring dough to cookie sheets so as to not distort the shape is key, and finally – addressing edges of cooked pieces prior to assembly is a must. If you are aware of this each step of the way, then you will end up with your best version of your ginger creation possible. On the flip side, don’t forget to have fun – even though a lot of this seems potentially stressful… at the end you will have something that you will undoubtedly feel proud that you were able to create. Few baked treats feel as satisfying as actually constructing a holiday themed building straight out of Dr. Suess, Charles Dickens or any of your childhood storybook memories – so with that… GOOD LUCK!
STRUCTURAL GINGERBREAD INGREDIENTS:
*Note: if you have a scale, use it! However if you do not, I’ve given conventional cup measurements which won’t be as exact, but should work OK if you do not have a scale
-
6 3/4 cups / 28 oz / 850 grams All Purpose Flour
-
3/4 teaspoon Cinnamon
-
1/4 teaspoon Ginger
-
1/2 teaspoon Nutmeg
-
1/4 teaspoon Clove
-
3/4 teaspoon Salt
-
7/8 cup / 7 oz / 198 grams Vegetable Shortening (14 TB if you’re using Crisco baking sticks)
-
7/8 cup / 6 oz / 170 grams Granulated Sugar
-
1 5/8 cup / 16 oz / 454 grams Molasses
-
1 Large Egg
-
Optional: crushed jolly ranchers or isomalt (ready to melt, not raw granules) for the windows and optional “gluing” method during construction
STIFF ROYAL ICING INGREDIENTS:
-
3 5/8 cups / 16 oz / 454 grams powdered sugar sifted
-
2 oz / 57 grams pasteurized Egg Whites (whites from approximately 2 eggs)
-
1/4 teaspoon cream of tartar
-
1 teaspoon vanilla extract
INSTRUCTIONS:
Prior to mixing:
-
Set rack to middle, and pre-heat your oven to 350°F / 170°
GINGERBREAD CUT-OUTS
-
Sift your dry ingredients together, set aside
-
Microwave vegetable shortening until liquid but not hot, small lumps are OK
-
In a stand mixer (or with a hand mixer), whisk shortening, sugar and molasses together. Add the egg and mix until combined
-
Switch to the paddle attachment and add your dry ingredients. Mix on medium/low until a smooth ball starts to form, do not over mix
-
Roll out dough onto parchment paper or a baking mat to 1/4″ thick. Try to make the dough as even in thickness as possible. (for rolling, either remember to dust top of dough and roller with flour – or for less of mess, my preferred method is to just lay a second piece of parchment on top of the dough and roll the dough out between the two sheets of parchment)
-
Freeze dough for 20 minutes (optional)
-
Cut shapes out using your templates on the base layer of parchment. Remove excess dough from around the shapes (use this to re-roll out and make more pieces).
-
VERY IMPORTANT: Transfer parchment paper containing cut-outs directly onto the cookie sheet. DO NOT ATTEMPT TO MOVE THE CUT-OUT ITSELF. You can very easily distort the shape of the cut-out, which will make your assembly much more difficult.
-
Bake in an oven set to 300º F for 50-55 mins until very firm (small pieces can be baked between around 45 mins, I noticed small pieces (( 2” to 3” pieces)) were getting overdone in the 50 minute range)
-
Once gingerbread is done, remove from the oven and to fully cool before moving and any assembly
STIFF ROYAL ICING
-
Combine your egg whites, sifted powdered sugar, and cream of tartar in the bowl of your stand mixer with the whisk attached.
-
Mix on low to get the ingredients combined then bump up to high for 1-2 minutes. Add in your vanilla extract and whip until it’s white. No need to mix for longer than 5 minutes.
-
Place the royal icing into a bowl or container with an airtight lid. Additionally, I like to place cling film directly atop the surface of the icing to help ensure it doesn’t harden.
-
This icing is THICK… which is a good base stock of icing to use for any consistency you need. For looser consistency, simply add back into the mixer and add SMALL amounts of water, incrementally until you reach your desired consistency.
TIP: use a spray bottle filled with water to control your water addition at perfect small and even increments. (if you accidentally add too much water, counter it by adding confectioners sugar to stiffen the mixture)

Assembly: Isomalt vs. Royal Icing
Pros and Cons
Royal Icing is the traditional “glue” that is used to adhere gingerbread pieces together – it’s the iconic white bead of icing around all edges and joints which gives gingerbread houses its distinctive “gingerbread house” look. Using the recipe above, you can spoon the icing into any piping bag with a big enough tip opening to provide yourself a nice thick bead of “glue” that will hold your walls and roofs together and provide the outline decoration you’re looking for. The great thing about using royal icing in your assembly is that it is quite forgivable – since it takes a good amount of time for the icing to thoroughly dry, you have a lot of flexibility when adhering your pieces together. In fact, if you need to completely redo – it’s very easy to take apart, wipe clean and start again. The CON about using royal icing is it takes so long to dry and set!.. it ideally needs about 24 hours or so to completely dry rigid, until then.. there is a real risk that the pieces could lose their grip and form. So, you need to assemble your house or part of house, then be sure to support it or prop it in a way that ensures the pieces stay in place while the royal icing does its magic and dries. Once dried, it should be reasonably stable – unless you have some structurally unwieldy piece of gingerbread architecture that the royal icing just can’t support. I would say that for most run of the mill gingerbread houses, royal icing should be just perfect.
If, however, you need some additional strength and rigidity – Isomalt is your best friend.
Isomalt is a naturally derived sugar substitute that comes from beets. It is this “sugar” like substance that is used in sugar free candy. It has very similar properties to sugar, thus you can melt it down and use it as quick acting “glue” to hold your pieces together. It is most commonly used to create windows of gingerbread houses – melted Isomalt remains clear versus melted sugar which caramelizes and turns amber and brown.
Tip: there are two types of Isomalt you can buy: granulated and ready to use (pre cooked). For ease, start with the ready-to-use version – they generally come in stick or puck form. All you have to do is melt and use.
For melting, I use the microwave. Using either a low wide glass dish or flexible silicone baking bowl, fill with a layer of sticks or puck then microwave in successive 20 second bursts, pausing between each heat. You’ll start to see the pieces melt and small patches of bubbling will appear. Once it’s mostly liquid, it will be ready to use. Note: the melted Isomalt is VERY hot – you should be very careful how you handle it so you do not burn yourself (that said, you’ll probably burn yourself a little bit… it’s par for the course). I use small flexible silicone bowls which allow you to precision pour the lava Isomalt on edges and seams, I also like the wide glass dish to dip entire edges of pieces at one go. Generally speaking, I use the wide large glass dish for larger pieces and the smaller silicone bowls for smaller pieces. As you work, you’ll develop your own preferences.
Once carefully melted and applied to edges of gingerbread, move quickly to adhere the pieces together. Isomalt will cool and dry relatively quickly, so you have to move quickly to place the pieces where they need to go and hold until they’re set. The quick cooling of the Isomalt is the PRO and the CON. The PRO is the Isomalt is very strong and provides much quicker assembly compared to royal icing. The CON is you have limited time to get the placement right!.. if you wait too long, or if your placement isn’t correct – it is much more difficult to redo compared to royal icing. However, it is not impossible – if you’re in a situation where the Isomalt is now candy rock hard you can carefully chip it off or sand it down with a microplane grater. If you have your sequence of assembly smartly planned out, you can quickly and efficiently assemble your structure and be done with it! – because of this, it is my preferred method of assembly. Then once assembled, you can simply pipe over the Isomalt seams with your royal icing to create the iconic outlined look you want!
The Back Story
This is a story of firsts – without a doubt – which to be honest, is pretty much in line with what I’m doing with my life right now.
As it turns out, I’ve never made a single gingerbread house, ever. I’ve always admired them from a far and had them on my wishlist of things to bake. Additionally, the concept of creating some abstract gingerbread architectural creation has long been a popular topic for us architect nerds around the holidays, yet in my lifetime of professional and social architect-dom – I’ve never seen it happen. So all that is to say, there has been a good amount of intention for the gingerbread creations…but I guess, no practical compelling reason to actually follow through with it…. That was until September of 2022.
Coming off the heels of an unsuccessful reality baking show bid,
(which was nuts to begin with!?… you’re asking me to audition for a television show?? What?..umm.. OK, LFG?!…but… there’s no logical way we would be chosen… these dumb ass shows aren’t exactly logical right, so there’s a chance? …… hmmmfff, with apparent logic intact, we weren’t chosen – anyways – topic for another post,)
I was simply scrolling through my Instagram feed and an ad came across my screen for a “5 borough gingerbread bake off” challenge hosted by the Museum of the City of New York City which would select 2 bakers from each 5 boroughs for a city wide display of “Wintertime in New York” over the holidays in their museum. The ad asked for a submission to simply include sample pictures of your bakes and a small blurb about yourself. Not thinking much about it, I applied (repurposing much of the stuff from that television show tryout).
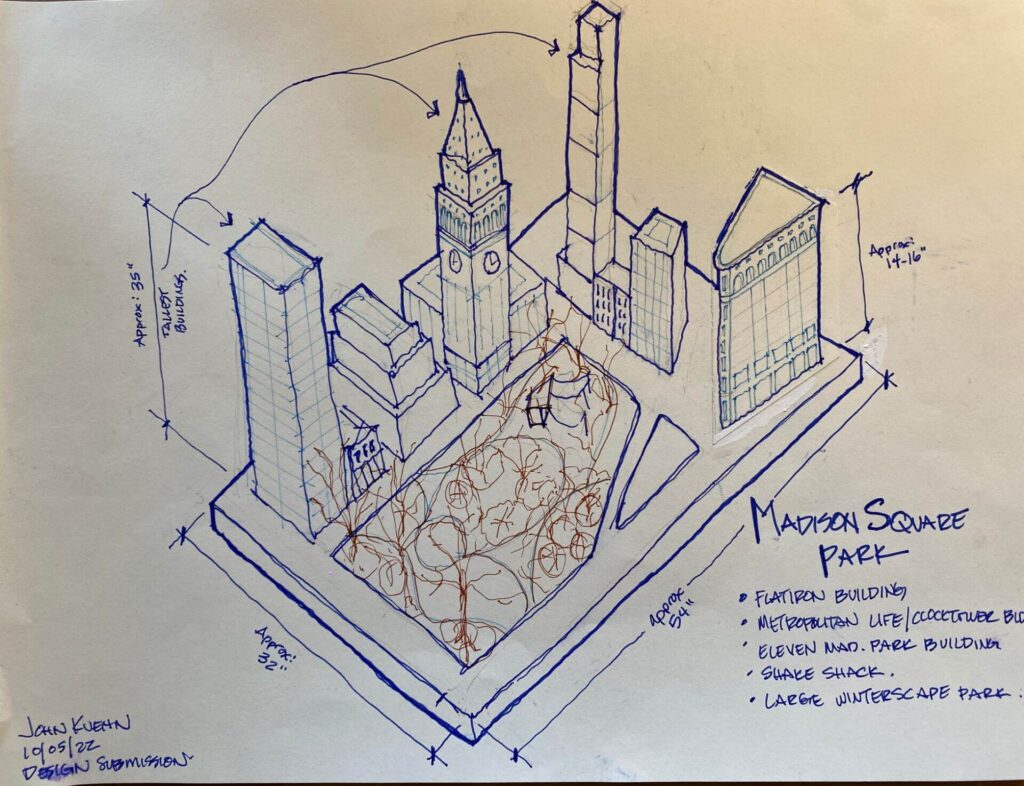
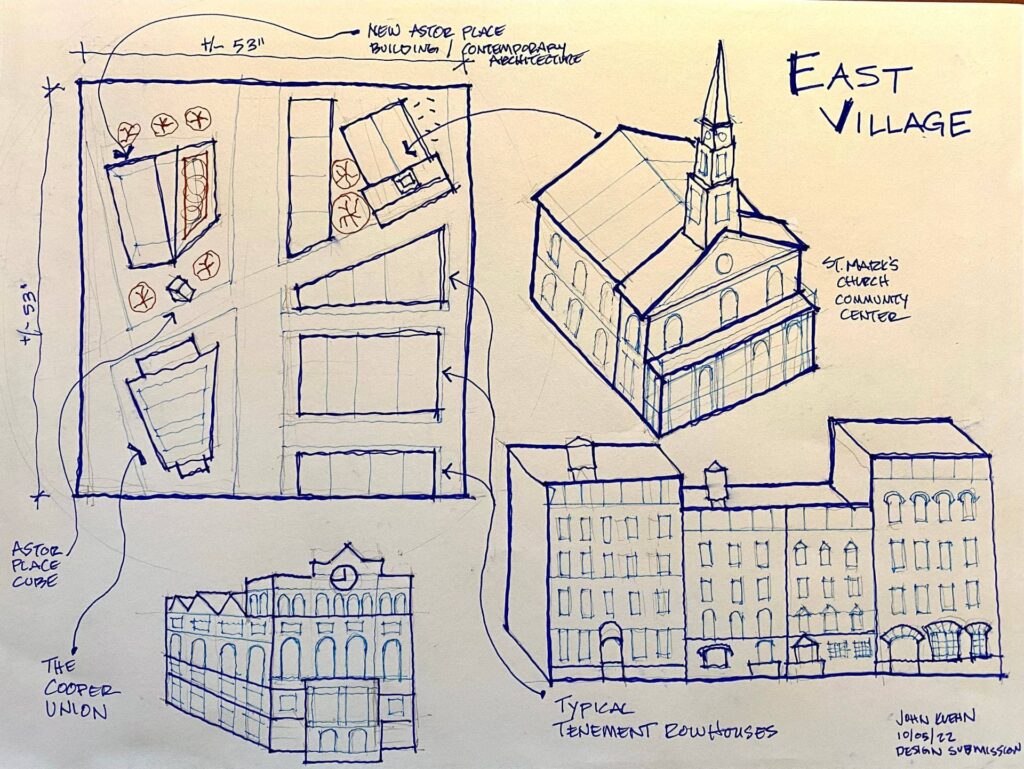
Having no expectations from the submission, I submitted my scant submission of photos of cakes and cookies (yes..gingerbread cookies…but NO gingerbread houses) on the 22nd of september. Four short days later I was informed that I had “been selected”…umm, wha? .. ok…YAY! (??)
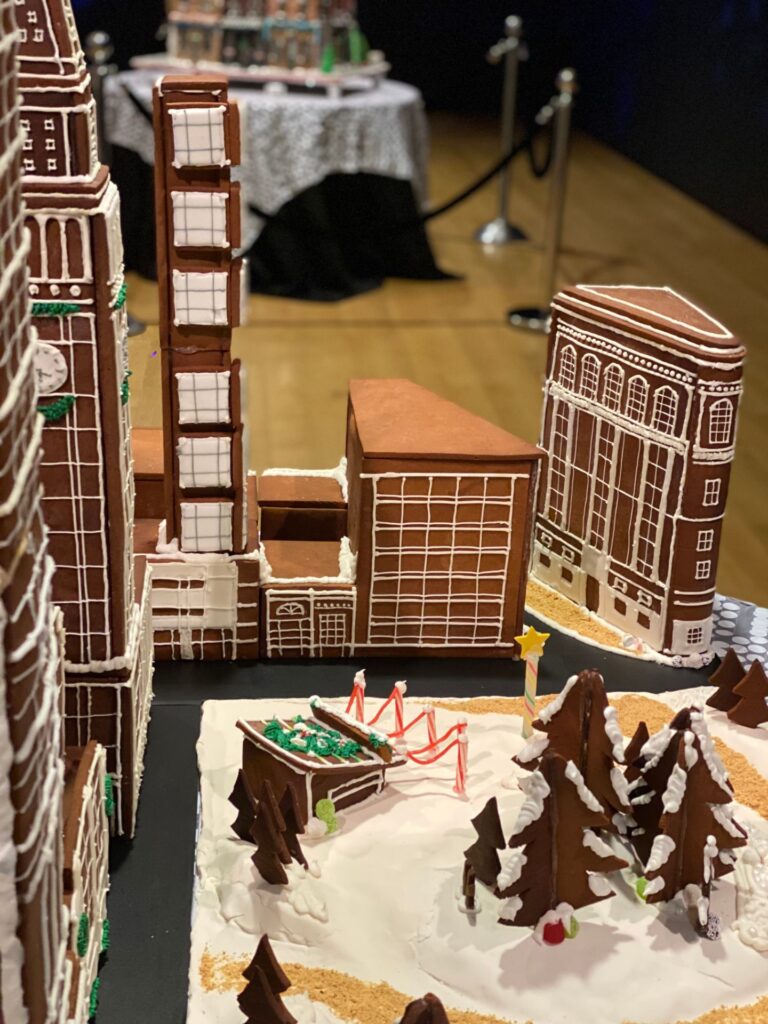
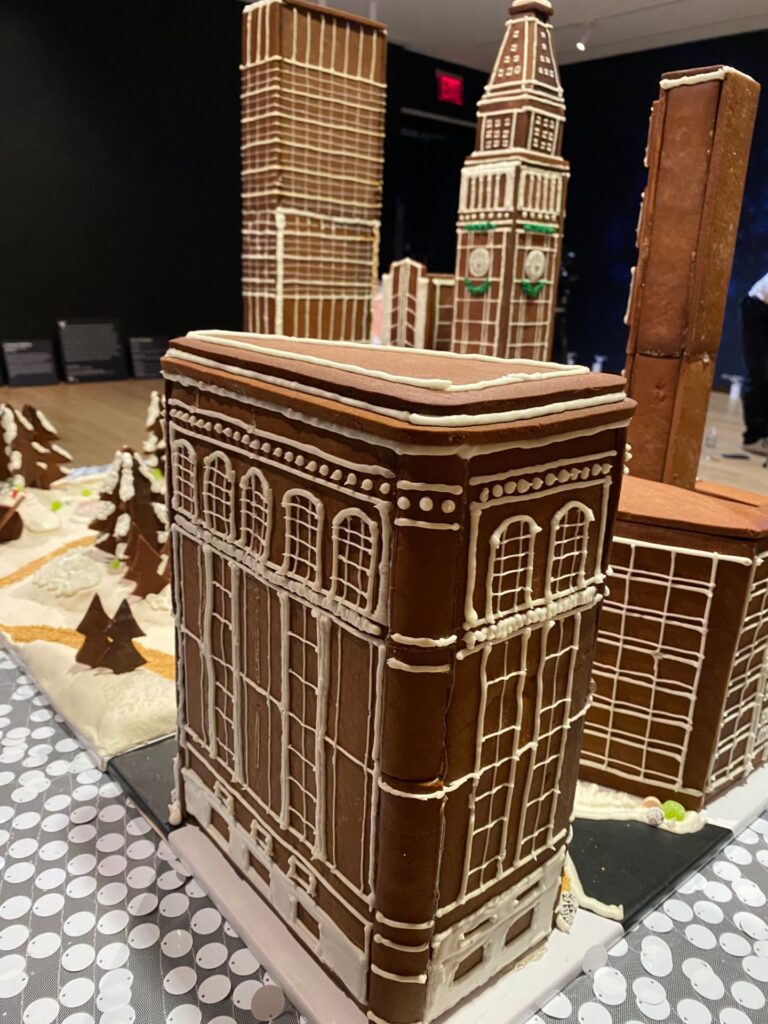
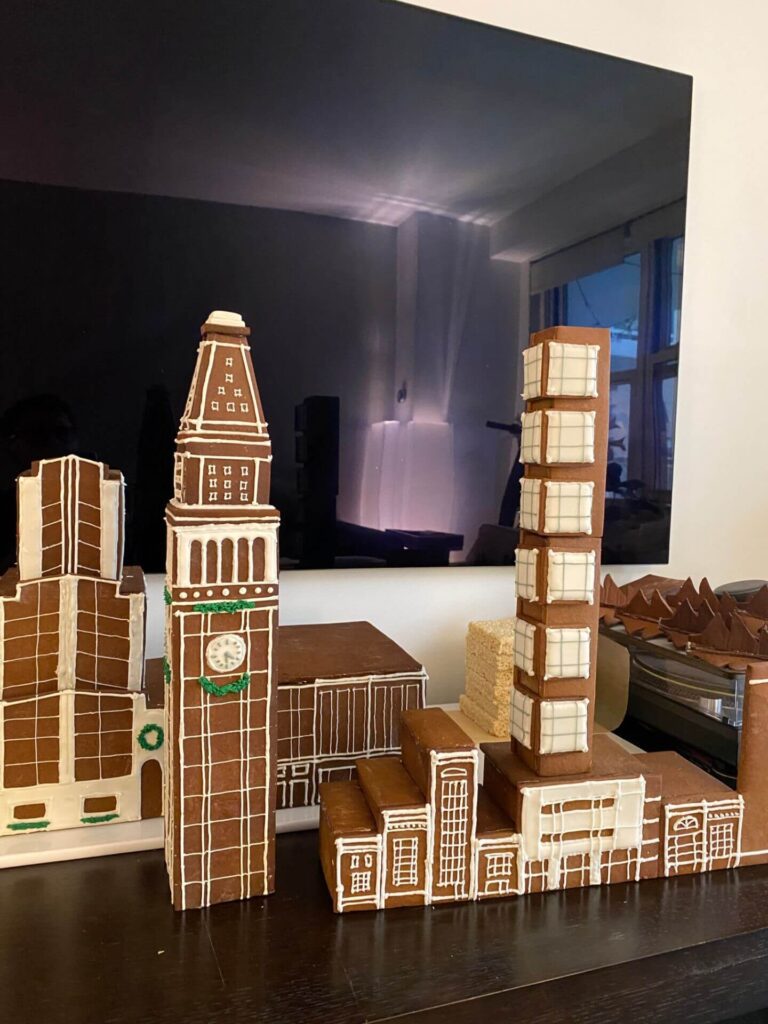
Next, the selected applicants were instructed to submit their design of their gingerbread concept representing their “borough, neighborhood or community”. I was representing Manhattan and figured I should sketch out two options “representing” Manhattan. The thought was I wanted to give the Museum an option in the event that myself and the other Manhattanite both submit similar designs (something terrible like two empire state buildings or two Highlines). To avoid obvious cliche Manhattan landmarks and to submit a design tied to my actual experience in NYC, I submitted diagrams of the East Village and Madison Square Park – both representing various personal experiences in NYC. The East Village would highlight some cultural downtown NYC locations like CBGB, Pyramid Club, a Wigfest in Thompson square park etc… while the Madison Square Park theme would highlight some historically significant architectural gems such as the Flatiron Building, the Metropolitan Life Insurance Tower… as well as a few more modern and contemporary skyscrapers. Not surprisingly, the museum chose the Madison Park sketch – I think mainly because of the inclusion of obvious classic New York Icons versus the more subtle New York icons of the East Village. Happy to proceed with Madison Park – my panic now set in on how exactly would I make gingerbread skyscrapers?
Thankfully – my years of watching ad nauseam episodes of gingerbread and holiday baking shows – I basically knew how to embark on the ginger building (thank you food network). Utilizing my architect skills and experience, the first thing I did was to measure and scale the buildings from google earth down to the max dimensions given in the rules: the display must fit on a 54” round table and be no taller than 36” from the tabletop.
To be recognizable, the architect in me wanted to try to keep the relative scales of each prominent building as accurate as possible (as dictated by available rando info on the internet), thus the Met Life Tower was the tallest at roughly 700’ and the Flatiron at about 285’..and being that I wanted the tallest ginger tower to be no higher than 32” I ended up with a super oddball scale multiplier of .04375 (something like 1:275..?)!
Architects out there, don’t come for me because this isn’t a standard site scale of 1/64” or 1:100 or something!… it’s just the math that I needed to convincingly scale within the prescribed limits!
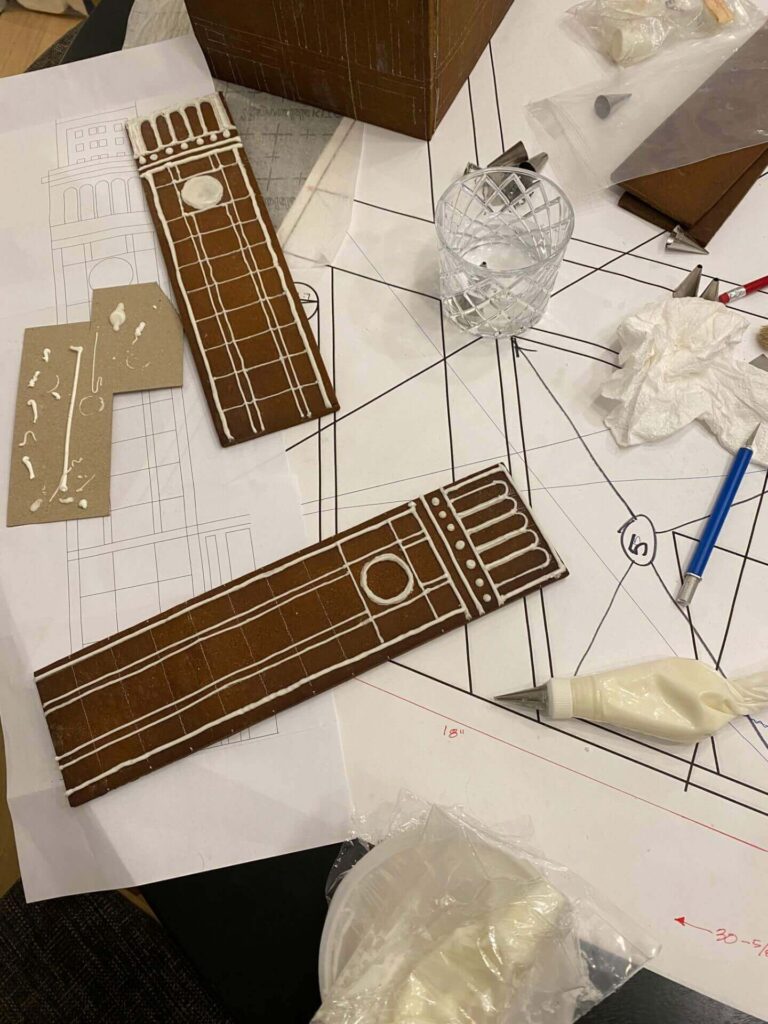
Once scaled, I embarked on drafting all the individual custom template pieces that would become the actual “cookie” pieces that compose the entire scene – which was in the neighborhood of 125 individual pieces. Once drafted in autocad (yes.. because i’m an architect), I printed these out and transferred the prints to 1/4” chipboard, then cut them out to create durable cookie templates. I used these templates to trace and cut out on the actual dough to create each individual gingerbread piece for the scene. For structural reasons, I opted to create each piece with a 1/4” thickness, thus I rolled the dough to precisely 1/4” thick using a thickness measuring rolling pin.
Without doubt, the designing, planning, scaling, templating and cookie cutting was the longest portion of the entire exercise. A good two weeks went by where I still felt I had nothing to show for all my hard work! At the end of that phase of the effort, all I had were stacks of flat building parts all over my dining room table, roughly organized into piles that would each become a building!…. The panic continued as I had nothing remotely recognizable as progress, PLUS I had the unknown and unsolved problem of understanding how exactly I was going to bind all these pieces and decorate the entire scene to look like a winter wonderland, per the vision I had in my head (and at very least, what I put in the sketch as the submission)

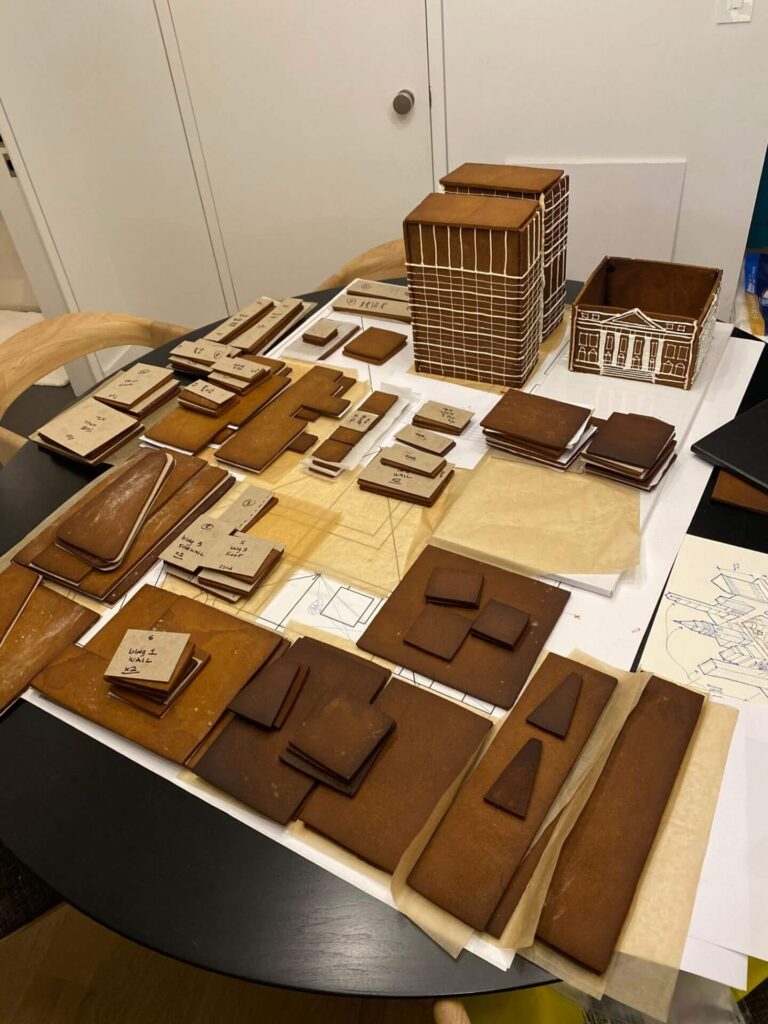
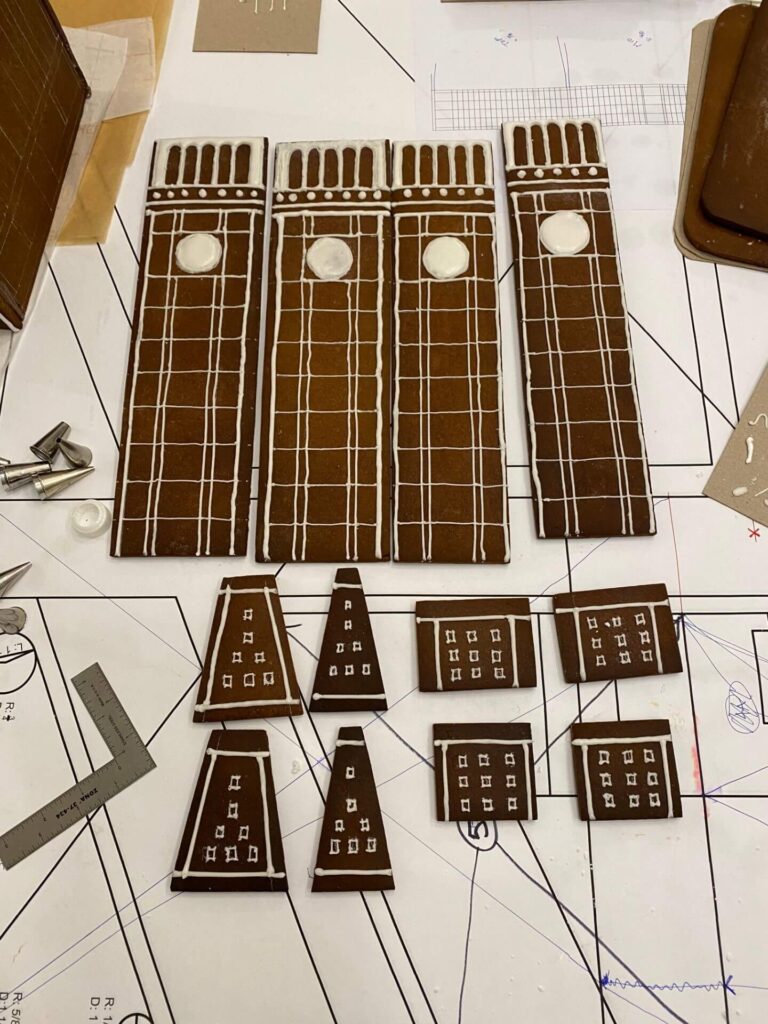
Now the real fun started (so I thought).. I was going to start decorating each facade – this is the bit that I was really looking forward to – this was the bit that would make these bland brown pieces come alive and start to look like the recognizable NYC buildings I loved. My decorative plan was simple, basic white piped icing on a brown cookie base – this is the classic “gingerbread” look that I love. After decorating, I was simply going to glue the facades together and voila!, three dimensional buildings would start to appear… But in reality, this is when everything got messy!.. I easily made multiple batches of royal icing en masse (see recipe above) – I hadn’t fully considered how hard it would be to adhere the 4 pre-decorated walls and roofs without completely destroying the piped on decorative royal icing (which was so fun to decorate). I tried all the obvious methods. I tried decorating then assembling (accepting that i’ll smudge up the facade design work) or build the building box with no decorations, then decorate each facade while laying it on its side, because I couldn’t possibly pipe vertically. Obviously this later method posed its own problem of how to decorate the fourth and final side since there was no bare side I could lay the building on. It was a bit of a stressful exercise of accepting that it’s not going to be perfect, I’m going to have to deal with smudges and I’m going to have to deal with trying to pipe on fixes and corrections once the building piece is fully built. It was at these moments that I tried to remind myself… this is just a cookie, no one will die, this is just for fun, this is just a COOKIE. My advice to you is to accept that you’ll successfully do some combination of the above, every ginger design is different and will require its own level of detail…and it’ll turn out amazing – no matter what. (one final piece of advice… if you can learn how to intricately pipe your design vertically, after completely assembling your building – do it! You’ll be my hero!…. Catch is, you have to be competent enough to pipe your designs vertically as well as you think you could horizontally…. That is next level shit!)
With about one week to go before the installation was to begin (my deadline)… I started piecing together the buildings. It came together quickly compared to the planning and process making, and I was (finally) feeling a bit of encouragement that I may actually pull this off – but not without a few trials and frustrating errors. I learned that rice krispie sheets are mostly your friend, but not your best friend. You can rely on them for lots of behind the scene heavy lifting… but (somehow not initially obvious to me) rice krispie is, after all, marshmallow creme and small bits of rice krispie cereal – so unsurprisingly… you can’t expect this material to act like rigid beams… ‘cause guess what.. It collapses! I had thought that I could use small sections of rice krispie “beams” to support facades internally, mid way up the interior of a ginger tower…only to discover days after gluing said beam in place with caramelized melted sugar – the whole thing started slowly falling down like a slow drippy gloop that obviously melted sugar and chemical marshmallow would do (most especially on a warm humid October day). This is super obvious to me now, but for some reason – I had really had put a lot of faith and support (emotionally and physically) into my rice krispie treats performing like superman. I learned to expect less for the forgiving sugary mass… and let it do what it does well, sit flat on a flat surface held down by gravity. Don’t try to suspend this stuff or use it like a bridge or some cool architectural cantilever- it’s just not good for that. What it turned out to be really good for..? was a life saver for my “Flatiron” building. This triangle building was built with three flat facade pieces and three curved radius pieces that serve as each building corner. This was a collection of way too many individual pieces that I could not brace together at once while simultaneously gluing together with lava hot isomalt… it was more like a wobbly house of cards that teetered on collapse as I tried to build it….. It was a disaster – I was almost about to write the Flatiron out of the show! Then I decided to reverse engineer this ginger building by building a solid geometric mass of layered triangulated rice krispie layers which would enable me to simply laminate on all the facade pieces….this worked!…honestly it had to, I had no other way to figure this out – now days before its due.
Miraculously… I had completed five building blocks and towers with a candy-land like version of Madison Square park in the middle of it all. All the pieces worked together like one large three dimension tetris puzzle. Now..the final challenge – deliver each piece, unscathed, far uptown to the Museum for the final assembly in place. This was the final panic.. The final hurdle that I wasn’t entirely sure how I’de complete without full disaster. Thoughts of gingerbread and royal icing collapse thanks to the NYC potholed streets and the 2005 era shock suspension system of our car is all I could think of. I knew that every isomalt and royal icing connection and gingerbread structure was one minor bump away from completely falling apart. My super diligent husband, Glenn, took a day off from work to help me in this travel endeavor. I also implored the help of my BFF, Carol, from Sunnyside to come out and assist with the transfer. We had the patience and enough hands to carry off the task, now having packed everything gently in boxes buffered with bubble wrap and packing peanuts – we slowly moved the boxes to the car and carefully got in place holding and supporting the boxes acting like independent human suspension systems carrying the most precious cargo. I made Carol drive so Glenn and I could carefully manage each box as we slowly rolled up third avenue at a speed no greater than 15 mph. (honestly, with traffic…that’s about as fast as you drive anyways). The four mile journey uptown to Spanish Harlem at Central Park took no less than 40 minutes it seemed. We did it! Carol navigated so carefully, slowly weaving around all the bumps in the road (there were many) and Glenn and I, almost cramping – had successfully held all the boxes without any known disasters. We came to our parking spot – and at least for Glenn and I – we could finally release our rigid muscular hold on the boxes…god, what a relief.
It was all downhill from here… all fun – almost no stress about what lay next – which was simply, the final installation in the actual MUSEUM. The installation period was three days – Monday October 31 to November 2. I arrived on Tuesday November 1, and to my surprise – there were only two partially installed ginger displays there! As it turned out, there were only 7 total displays in total, not 10 per the original plan – one baker from Manhattan, Bronx and Staten Island had dropped out (or maybe this is all who applied? I would never know). I spent about 4 hours carefully stacking and adhering each building component, going over seams and gingerbread buildings with final royal icing touches as well as all final candy placements in the park.


2 thoughts on “Gingerbread NYC: The Great Borough Bakeoff”
Wow. What an amazing story and thank you for the intricate details! Absolutely love shake shack too! Happy Holidays!
Glad you liked it!!