


OK…there’s nothing more simple than a pie crust, right??
I mean, it’s barely 4 ingredients – all mixed together, then rolled out and placed in a pie dish where it’s poised to contain the star of the event – the filling! By contrast the pie shell seems like this necessary yet forgettable component that you must have (I mean, you can’t have pie with the crust?? right)…yet maybe no one gives it any thought. It seems so simple, why would you?
Well, of course…. you would be highly mistaken…one could argue (I could argue)…the pie shell is maybe THE MOST important part of the pie! The ingredient list is so simple, yet so controversial!..make one small change and the whole equation is different. Swap butter for any other fat (shortening, oil, creams, or even lard) and you’ve opened up Pandora’s box among the devout. Of course various flours, salts and sugars all add their imprint to the venerable pie filling container – all eliciting strong opinions for or against.
For the purposes of keeping this post concise ( I really tried) – I have narrowed down the recipe to a simple pie shell made of only butter, all-purpose flour, a dash of regular salt and some cold water – your super basic butter pie shell crust. Even with that distillation of basic ingredients we are not out of the woods in the rabbit hole dive that is pie shell crust making.
Once you’ve agreed upon the ingredients…then comes the science project-like approach which is the technique of mixing everything just right so you end up with the holy grail of pie crusts- buttery, light, tender and flakey. This is a pastry after all – thinking of all the pastry cousins out there like croissants, breads and cakes – it really does come down to the technique of making that results in a successful final pastry.
So here I list the ingredients and the mixing instructions – as I like to make my crust. Again – there are a gazillion other ways to make pie crusts – and if so inspired, you can literally experiment your own way by literally dumping all the ingredients in one bowl and mix until you have something rollable. With any luck, it probably wouldn’t be that bad, definitely not inedible… but once you give the nuance of chilling, cutting, folding, and limited handling a chance… you may just notice how sublime a buttery flakey crust can be… which in my opinion is always the “make it” or “break it” piece of the pie.
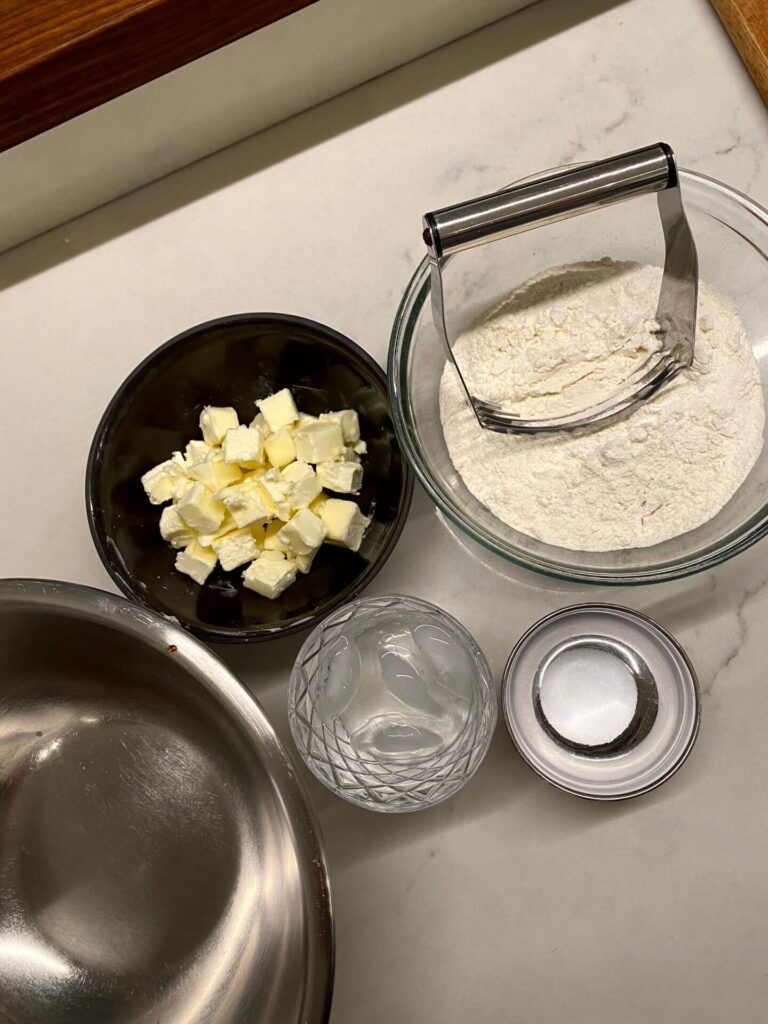
INGREDIENTS:
300g / 2 1/2 Cups All Purpose Flour
28g / 10 Tablespoons Unsalted Butter – cold and cut into small ½” cubes
1 1/4 Teaspoon Salt
6-7 Tablespoons ice cold water
INSTRUCTIONS
General Notes:
The main thing you want to keep in mind is you want to work quickly to keep the dough from being over hydrated or “overworked” -which will cause excess gluten production, which will end up giving you a more tough rather than flakey dough. How does the excess gluten process occur? It can happen when the butter starts to melt and releases its water to form gluten with the flour and/or you over knead the dough and/or you add too much water to the mixture
You NEED to use chilled ingredients, I often put butter AND flour in the freezer for 10 – 15 minutes to help ensure the mixture remains cold during the mixing process. Liquids are chilled on ice before adding the mixture.
When handling the dough – don’t go crazy over-kneading the dough pretending you’re a bread baker! (as tempting as it may be…)
Add liquids sparingly and one tablespoon at a time, err on the side of the dough appearing dryish (like damp sand) vs. too wet. It should just hold together when you ball it up. As the dough sits in the refrigerator it will continue to fully hydrate
Prior to Mixing:
Before chilling the butter – cut it into small cubes. Cut the stick of butter once lengthwise, keeping the stick intact (with one single lengthwise cut) , rotate the stick onto an uncut side and cut the entire stick lengthwise again. Now you should have quartered the stick into 4 skinny sticks. Slice the intact stick at 1/2″ intervals resulting in 4 small cubes of butter at each slice – do this for all 10 tablespoons worth of butter. Separate all small cubes, place on a plate and then into the freezer.
Mix:
Whisk the salt into the flour in a large bowl
In that same large bowl, start to combine (“cut”) the butter into the flour.
There are many ways you can do this. The ultimate goal is to have a loose, dry pile of buttery flour with varying sizes or recognizable butter chunks remaining – about half of the dough should be cornmeal like texture with small to pea sized pieces of visible flour covered butter. The remaining portion of dough can be larger chunks of flour coated butter – these chunks should be flattened and about the size of coins (dimes to quarters)
This is what I typically do:
Take half the chilled butter and mix into the flour with the goal of achieving the smallest pieces of butter:
Use hand held tools such as a pastry cutter or two knives to cut the butter down to very small pieces, or
Use a food processor and blitz the butter and flour combo a few times until coarse cornmeal texture is achieved
Take the second half of the butter and work into the flour mixture with your hands. Be sure to work quickly as you don’t want to heat the mixture with the body heat of your hands. Goal here is to flatten each of the small cubes into small flat smears of butter. To do this, I flatten each small cube between my thumb and forefinger in a smooshing motion while in the flower mixture. I work quickly in the bowl to smash each cube and be sure all butter is covered in flour.
Add the Liquid – add one tablespoon of ice cold water at a time.
In your large bowl, mound up the buttery flour and create a well in the center. Add a tablespoon of water in the center, and begin to mix into the buttery flour. Start with one hand, working the flour from the bottom, outside of the pile into the center of the well, and work in a circular motion moving around the well. Repeat this for each tablespoon of liquid. Remember, you only need enough liquid for the dough to begin to hold together. Test this by grabbing dough in your hand and squeezing into a fist – if it holds together in a clump the shape of the inside of your fist – you’re good! (Note – you may not need all 6 or 7 tablespoons of water, or you may need just more)
Water with Vodka or Vinegar: All three of the liquids will hydrate the dough to enable you to form the loose ball of dough you need to make a pie shell. However, Vinegar and Vodka are often used because they are NOT water (well, they do have SOME water in them, but much less than actual water) – thus they don’t contribute to the initiation of the gluten process. This is a great hack to use if you’re afraid you may use too much water and cause too much gluten to develop (which makes for a tough crust).
Sooo… if you’d like to try this version – just substitute half of your water with vodka or vinegar – do this by adding one tablespoon of water followed by one tablespoon of vodka or vinegar and repeat. (fun sidebar, you can absolutely use flavored vodkas, any other 80 proof liquors like whisky or bourbon, or flavored vinegars like apple cider vinegar – for a slight flavor add to your crust!)
Turn dough out onto parchment paper: Dough should be a crumbly pile. Start to ball the dough together with your hands, knead it a few short times. (again – not too much – like water, kneading your dough will also increase the gluten development)
Fold the dough: roughly roll the dough to a thick flat rectangle and then use the paper to fold the dough in on itself in thirds like a business letter. Rotate 90 degrees and repeat.
Separate the dough in half and form into disks, wrap each disk in plastic wrap and place in the refrigerator. Dough should chill in the refrigerator for a minimum of 30 minutes. The dough will fully hydrate with the level of water moisture in the mix over this period. This will slowly create the gluten protein bonding that you want for dough to be dough and result in a tender, flakey pie crust!
Roll out the dough: Remove one disk from the refrigerator, unwrap and place on a large piece of parchment paper, lay a second large sheet of parchment paper atop the dough disk. Using a rolling pin, roll out dough evenly and symmetrically until you have a large round shape – approximately 12”-13” in diameter. You should roll out to a diameter dimension about 3”- 4” larger than the pie pan you’re using (i.e. dough for a 9” pie pan should be rolled to about 12”-13”in diameter).
Note, I roll between parchment papers because it’s cleaner, and easier as you don’t have to deal with dough sticking to the countertop or the roller – also you won’t need flour on any of those surfaces to reduce dough sticking – which only adds more unnecessary flour to the dough mixture upsetting the careful water to flour hydration ratio.
Lightly grease or butter your pie pan.
Transfer the dough on to the pie pan: Another benefit of using the parchment paper method is it makes transferring your dough very easy. Remove the top layer of parchment, pick up your base layer of paper with the dough and carefully flip over atop the pie pan- adjusting to center as needed. If you’re having difficulty placing the dough onto the pie plate – you can try the folding technique:
With the top layer of parchment removed, lift the edge of the dough off the base layer of parchment and fold the entire dough disk in half (leaving the base layer of parchment on the counter – do not fold the parchment). Fold the dough in half again. Now the dough should be the shape of a quarter of a pie. Lift the dough into the pie pan, with the point of that quarter shape in the center of the pie pan. Simply unfold the dough twice and you should have successfully transferred your dough to the pie pan.
Trim the edges: once dough is laid on and into the pie pan – you should trim all excess dough that hangs over the pie pan edge. Use a knife or scissors to trim neatly. Be sure to leave enough edge dough for your desired crimping
Build up and crimp the edges: there are tons of various crimping styles – which are mostly decorative – however the function of building up and crimping is to create sturdy solid edges around the pie to hold contents as they bake, which have a tendency to overflow. Start by folding the dough edge under itself about a half of an inch all around the pie shell. Then, with this bulked up edge dough – you can crimp whatever style you’d like. I like to do a simple finger crimp – which uses your forefinger of one hand to push the edge between the thumb and forefinger of the other hand – all around the circumference of the pie shell. Another simple style that my mom always did growing up (I think??) is to use a fork to create impressions all around the built up edge. Again, the goal is to build up the edge, then seam it with a crimp.
Dough is forgiving!.. If in the process you have torn some dough, or a hole appears on the bottom – don’t worry!…just smoosh and seam the dough together to fill in any problem areas. Also you can use trimmings to fill in any areas that need it.
Repeat step 7 if you plan to have a top layer of crust. Simply lay the round disk atop the filled pie, crimp together with the bottom layer and poke holes on top for venting. Or, you can use this dough material to create a more fancy lattice top, or any other design of your choosing.
DON’T THROW AWAY THE TRIMMED PIECES OF DOUGH!… This is valuable buttery deliciousness!.. One thing my grandma used to always do was to roll out the scraps, sprinkle with a heavy hand of cinnamon and sugar, then roll up the dough and slice off pinwheel style cookies. Bake in the oven for maybe 10 – 12 minutes…or until desired brownness….and enjoy your secret baker’s snack! (share with others if you’re feeling particular kind that day…but don’t feel guilty if you don’t)
